Thursday, November 14, 2013

My FAUXlifax: November 10 - 16

I went with a Fall theme this week... you know, because it's supposed to be 90 degrees all week.

UGH.


Large kraft polka dot tape and red/black glitter stickers are Recollections by Michaels.
Green faux bois tape is Scotch.
Solid orange tape is Up and Up by Target.
Yellow honey comb tape is by My Mind's Eye.
Gold dot tape is MT Tape.
Leaf stickers are Sticko by EK Success.
Don't Forget sticky note, gold striped sticky tab, gold dot sticky tab, and green crosshatch sticky flag are all from the Target Dollar Spot.  Oh, so is the smiling acorn sticker.

My mom's birthday is on Saturday and I'm thinking of getting her a couple of boxes of Ding Dongs.  She doesn't get out much so I don't think she knows Hostess is back.  Even if she does know, she'll still be excited about Ding Dongs.  I know I was!  HA!

Labels: , ,

Monday, October 28, 2013

The FAUXlifax

Remember that one time when I was all like OOH I NEEEEED A FILOFAX BUT I HAVE NO NEED FOR ONE!!!  WAHHHHH!!!

Yeah.

I couldn't shake it, so I decided to compromise.  A real Filofax (I know I want an A5, either a Domino or a Finsbury) will easily set you back a hundred bucks, and honestly, my cheap self isn't really willing to take the risk of dropping that kind of dough only to use it for a few weeks then get bored with it.

Enter:  The FAUXlifax.


Hee hee.  Get it?

I dug around in my craft room and came up with this little plastic three ring binder.  It's about eight inches wide, nine inches tall, and one and 3/4 inches thick.  I used to have ideas for scrapbook layouts that I had clipped from magazines pasted inside.  Unfortunately, those ideas were looking pretty dated so I decided to go ahead and repurpose the binder!

You can find these little half size binders anywhere - Staples, Walmart.  Target has some really cute ones right now.  They're pretty reasonably priced, especially when compared to buying a planner.  Even the cheaper brands like Day Runner will still set you back about $30.

The ribbon was already on there to hide that this binder has two random holes punched there in the cover.  I have no idea what they're for - heck, I don't even remember where I got this binder because I've had it so long!  The elastic holds it closed for now until I can decide what I want to do about that situation, since obviously it doesn't have a closure like a real Filofax would.


The smartphone sticky notes were 97 cents at Walmart, and the pad was pretty thick.  I took just the top fourth or so to put in here.  The houndstooth is a plastic sheet by KI Memories that I had in my stash.  I cut off the decorative edges to make the protective top sheet for my binder. I put a little washi tape on a mini binder clip and used that to hold the notepad to the plastic.


Every planner needs a Year at a Glance page, so I Googled "year at a glance 2013" and found one that I liked. They're FREEE!!!  I added Hello Kitty and the year at the top in Photoshop. Again, Google image searches will help you find just about anything you're interested in to put up in that space.


Since 2013 is almost over I went ahead and did one for 2014 as well.


The dividers for my sections are pretty simple.  I found four sheets of heavyweight, double-sided patterned paper in my stash.  I trimmed them down to 5 3/4" x 8 1/2" and reinforced both sides with washi tape where I planned on punching holes.  The tabs are old Heidi Swapp self-adhesive tabs that I've had forever.  I loved them so much when they came out that I may have hoarded a few.  You know how it is.

I added the subjects with my P-Touch labeler.  I plan on putting colored bits of paper in the plastic eventually to make them sturdier and easier to tell apart.


This is what a week spread looks like when I open the binder.  I used some of the scraps from the KI Memories houndstooth to make two page markers. They're two inches wide and nine inches tall.  I traced one of the self adhesive tabs on the top with a fine Sharpie then trimmed it to give them some shape.  This way, I can just grab that tab on top and open to the current week.

Can I tell you how much I love having a reason to buy cute stickers now when I see them?  I would have skipped the Hello Kitty stickers before, but now they have a purpose!  Hooray for reasons to bring more cuteness into your life!


Instead of having a separate section for Monthly pages, I decided to make a monthly calendar that I could move in the planner.  Instead of having to flip back and forth between sections to see important dates, it's right there in the middle of my current week for reference.  When the week is over I just move the calendar along with the page marker to the next page. When I get to November, this one will stop moving and the one for November will start.


This is my current week's spread.  You can see I haven't written anything down yet.  I don't have a lot going on next week.  Honestly, I don't have a lot planned most weeks.  So why do I do this?  Well, for starters, I love to decorate the pages.  I'm really starting to feel out my style here in the fourth week of doing this.  I also make notes at the end of the day of things that happened, what we had for dinner, and any funny things the kids did or said.  This way when I go to work on my Project Life pages for those weeks, it's easy to flip back and see things that I may have forgotten about because I didn't take a photo. I also add reminders to mail out birthday cards and what appointments we may have when they come up.

I will go into details about what I used on this page in another post, as this one is already getting pretty long.


The next section is the Meal Planning section.  I've shared these printables from Hello Cuteness before. This one comes two to a page, so all i had to do is print, cut the page in half, punch holes, and pop them in the binder.  Easy Peasy.


After the meal planning page I have a pocket page that I made from a sheet of 8 1/2" x 11" cardstock.  Just cut the sheet in half, then take one half and fold that in half widthwise.  Cut from the top corner to just about an inch and a half from the bottom corner at an angle.  Put adhesive along the side edges (not on the fold or where you cut), slide it over one end of the other half of the cardstock, and glue.  Ta da!  Pocket.

I put washi tape along the edges of the pocket to reinforce it and also give a visual guide to where the opening is.  This pocket can be used to hold recipes, coupons, etc.  There's a Hello Kitty paper clip (found them at Walgreen's a while back) at the top to hold things as well.  This serves as a sort of "this week" page marker for this section.

Behind that is my grocery list.  It is also from Hello Cuteness, but I've modified it a bit.  I made it smaller to fit in my binder, for starters, since the original was a full sheet.  I also modified some of the categories to suit my needs.  For instance, the produce category was just not big enough.  I never had enough spaces.  However, there were whole categories, such as paper products, that I knew I would not use very often.  Honestly, the only paper product we use is bathroom tissue and that can go under Misc. when I need to buy it.  So I got rid of that and added a Costco section because that is something that I do need.

You have to make your planner work for you, or you won't use it, right?


The next section is dedicated to Project Life.  I designed these sheets so there were two on a page.  All I did was print, cut, punch, and put them in the binder.  Easy.  Here's what the blank sheets look like:


If you've seen any of my PL posts, you know that I generally go for this basic layout.  Sometimes I'll put three cards across instead of two or four, but I always have three rows of cards.  I just don't really like the look of vertical 4" x 6" photos.  I don't know why.  There are very light lines in there to help me mark off where I am putting what.

If you click on the sheet, you will see an enlarged version.  You can right click it and either save it to your computer or print it.  It's a surprise freebie, from me to you!

The lines under the grid are to write down what happened when and what you're putting where.  You can look at the first photo of this section to see an example of the week I'm working on.

YES I AM BEHIND.  :(


The last section in my FAUXlifax is the Lists section.  Right now, there is only one list in there - my Daily Chore check list printed on cardstock.  I put another one of those clear self-adhesive tabs on this, only on the top this time.  This will make it easy to thumb through the pages without the divider tabs getting in the way.  I need to label it still.  Slacker.

Eventually I'll add Christmas shopping lists, a master birthday list and probably other random stuff.

That's my FAUXlifax!  It has just what I need, and nothing more.  I have no need for an address section because I keep my contacts on my phone and laptop, so I left it out. I don't need a notes section - I can either write notes on the notepad up front, or on my calendar pages.  When you start from scratch it makes it easier to just add stuff as you decide you need it without paying for stuff you don't.

I'm thinking if I stick to doing this for a while, maybe I'll upgrade to the real thing.  Then again, maybe I'll get so set in my ways of using this one I won't want to upgrade!  Only time will tell.

If you don't already, you can follow me on Instagram.  My user name is splendidmissm. I've been posting my weekly pages (along with many other people - seriously the creativity  there is amazing) under the "filofax" hashtag.  I also use #fauxlifax to mark my pages. 

Let me know in the comments if you have any questions!

Labels: , , , ,

Tuesday, August 28, 2012

Sick.

This is what I feel like today:


Actually, that's what I felt like yesterday... and the day before.  Being sick is lame.  Fortunately for me, my friend lent me this last week:


It's called a Mamaroo, and while it is kinda freaky looking, the baby seems to like it.  Between this and the sling I was able to get a little bit more organizing done around here.  Next project - the linen closet.

Our house has two linen closets.  One is a narrow little thing (the door is just under 18 inches wide, to give you an idea) near the small bedrooms, and the other is twice as wide, near the washer and dryer.  I commandeered the small one to hold my "accessories." You know, all the little jars, vases, dishes, etc that I'm not currently using in my decor but I'm not ready to part with just yet.  The big one held our towels, sheets, etc.

The problem?  Well, since I'm not one of those people who buys sheets and/or towels as a hobby, we don't have a lot of those things.  That meant that there was a lot of extra space in the linen closet.  I find that when we have space that is not accounted for in some way, that is when things tend to get unorganized.  Piles flop over, things get crammed in open spots because it's faster than figuring out where they really go, junk gets held onto because there is room for it... it's just bad.

On the other hand, my accessory closet was too full.  When you're dealing with a lot of glass, especially vintage milk glass, you want it to have room so things don't bump and get chipped.  I just didn't have that sort of space in there anymore.

The solution?  Swap the closets.  Duh, Sara.

I put it off for a long time because I knew it would take several hours.  I'd have to empty one, clean it, move stuff, purge junk, clean the other, move the rest of the stuff, purge more junk... blah.  My energy levels while pregnant were pretty much non-existent so no way it was getting done then.  But now?


This is the new, improved accessory closet.  Everything has a spot, like items are neatly grouped together, and I can see what I have.  Awesome!


In the linen closet there is now just enough room for what we need.  I got rid of the old, the mismatched, and the stained.  Everything has a spot and there is just enough room for things to fit neatly.  No more cramming random junk in here!  Yay!  Organized spaces make me happy.  :)

Labels:

Sunday, August 26, 2012

Back to Old Tricks

Friday afternoon I was rooting around under the kitchen sink looking for something (I forget what now) when I found something else entirely - a rather large puddle.  It was near the back of the cupboard and there was a basket over it which explains why it wasn't noticed sooner.  Obviously we had a leak and we had that leak for a while because the bottom of the cupboard was warped and all the forgotten bottles in the back were covered in hard water residue/mystery scum.  

Well, crud.

My husband called the landlord who said he would be out the next day to have a look.  We pulled everything out from under the sink and dried the area, leaving the doors open so it could air out until the landlord's arrival.  When he showed up Saturday morning, he poked around and said he had to run to Home Depot for a few things but would be right back.

Don't you know he came back with a NEW SINK AND FAUCET???  

I was so excited!  Our old sink was the white enamel kind and it had a lot of chips and stains.  You could follow Fly Lady's sink shining instructions until your hands looked like Madonna's, and that thing still would not look good.  Also, the old faucet was one of those cheap stock ones - very low, very old, very crusted with years of hard water crap.  You could barely put a large pot under it.  I hated it so much that I had even considered just buying one eventually even though this is a rental and I'd be out that money, so you can imagine how excited I was to see those boxes!

Yes, I am officially old.

After he had worked for a little while, he announced that he didn't like the sink he bought and wanted to exchange it for a different one.  The second sink is made with a thicker gauge stainless steel to make it more resistant to denting, is insulated to make it a bit quieter, is way deeper, and has the drains set farther back to allow for more room/access under the sink.  Pretty clever huh?  Not only did he come back with a new sink, he replaced the drinking water faucet for the filtered water with a pretty brushed nickel one.  The old one was part plastic and sort of cruddy from the previous renters.  I cleaned it best I could, but never trusted it enough to actually get drinking water from it.  Thank goodness for the fridge dispenser!

The new faucet not only is taller, allowing me to fill even my really large stock pot in the sink now, it has a sprayer!  I haven't lived somewhere with a sink sprayer in years.  It's the little things, I tell ya!  As a final fun detail, he decided that since he had gotten rid of the air vent thingie for the dishwasher that used to be up there, he'd replace it with a soap dispenser.  One less thing to clutter my counter tops!  Yay!  Here's what it looks like now:


I don't have a before photo, but you'll have to trust me when I say it's a million times better.  To keep with the theme of improving things in the kitchen, I went ahead and told my husband I'd put all the stuff back under the cabinet.  I started by cleaning all the cruddy bottles.  I checked sprayers and tossed any bottles that didn't work or were empty/almost empty.  Since we mostly use natural cleaners, some of this stuff has been here since we moved in almost two years ago!  Then I put things back so that the stuff that got used often was right up front, the other stuff was put away neatly, and NOTHING was left in the back to be forgotten.  Here's how it looks now:


My husband was off with his friends working on his fantasy football draft, so I went ahead and cleaned some of the other lower cupboards that I had been meaning to reorganize anyway.

The two small cupboards flanking the stove were way underutilized before.  I had a wok and a teflon frying pan on that top shelf - that's it.  Talk about a waste of space!  The bottom shelf literally had a bunch of random items for which my husband couldn't find homes, so he just crammed them in there all willy nilly.  No more!


Now the colander, sieves, and salad spinner are on the top pull out shelf.  This cabinet is right next to the sink so it will be easy to just grab these items by where they'll be used most.  On the bottom I have little used items that I didn't want to get rid of just yet - a Little Dipper Crock Pot, some cake decorating boards in a basket towards the back, a small roasting pan, a tortilla press, and some steamers.


In the other cupboard I put all the plastic storage containers on the top pull out drawer.  Since that's where leftovers are put away, it makes sense for them to be there!  If you're thinking I don't have much - you're right.  I don't care for plastic.  The little I do have is mostly of the Gladware variety, for my husband to take leftovers for lunch.  On the bottom shelf are my hand mixer and pasta maker attachment for the stand mixer. I don't use them a lot so they're near the back.  I also have the waffle maker back there and a plastic pitcher that is occasionally used for making iced coffee.  In front of those are the potato ricer and a hand mixer, as well as the plastic bin I use for making bread dough.

Everything that was in those two cupboards was previously located in this double cupboard by the fridge:


The cookie sheets and muffin tins were also in there.  As you can imagine, this made this cabinet a jumbled mess!  Now it just holds pans and everything is neatly arranged so I can grab what I need easily.

It feels so good to be able to work on getting things organized again!

Labels:

Sunday, June 10, 2012

Do Work

I think, in the last two days I've done more than I have in the past two weeks.  Maybe even the past month!  It's no secret that this pregnancy has kicked my behind as far as fatigue goes.  I was tired to the point of exhaustion pretty much the entire first half, and then it came back the last few months.  I have some good days where I feel like I can actually do stuff, but then I inevitably pay for it the next day in the form of a stiff, sore body, swollen hands, and of course, being really tired.

It kinda sucks. 

I feel like such a lazy slug!  I'm thankful that I don't have one of those husbands who feels his only contribution to our household is to bring home a paycheck.  Seriously, if he thought his work day ended when he came home, but saw no problem with mine being 24 hours, I wouldn't have married the guy.  He's been so good and picking up the slack where I haven't been able too.  He has no clean underwear?  He won't say a word - he'll just throw a load in the wash.  I'm too tired to cook?  No sweat - he'll whip something together or go grab us a pizza.  He understands that I'm having a hard time right now, and that marriage is a partnership - sometimes you give, sometimes you take, but you should always try to support.  I love him for that.

I have 22 days (!!!) until my c-section is scheduled, and only fourteen until my due date.  This means I need to get my behind in gear and try to get this house in some semblance of order.  I still haven't installed the car seat, or packed a hospital bag.  I still need to go buy baby bottles and a few other last minute items.  The list seems huge for the small amount of days left, but at the same time, I find myself not really worried about it.  I'm doing what I can, asking for help with what I can't, and if something doesn't get done, oh well.

Is that Zen or apathetic?  Can't tell.

One of the things I definitely wanted to get done before I have this baby is to make a bunch of meals to freeze.  When Bubba was born, we were in an apartment and had a teeny freezer, so this really wasn't much of an option.  We also had no money to buy a stand alone freezer, and even if we did, we had nowhere to put it.  As a result, no planning or prep for our meals after baby was done and we ate fast food a LOT.  Like, a disgusting amount a LOT.  I'm sure we wasted a ton of money too.  

I don't want to do that again.  I want to have homemade meals, at least most of the time.  Things that I made so that even though they may not be the most nutritious items, they're better than their processed foods counterparts.  My friend Suzy gave me her old freezer since her daughter is off to college and it wasn't really needed anymore.  I've been loving having it, but I haven't been using it to it's full potential. 

Well, the time has come.  Friday while I was doing laundry (all of it!  Nine loads and all dried on the clothesline!  Lots of bending and stretching and carrying and walking) I worked on a meal plan and a grocery list.  Since my grocery list document is dated, I was able to tell that it's been almost a whole year since I've done this.  YIKES.  I pulled my grocery circulars, went through what was on sale, then went through the list of freezer meals I wanted to try (pulled from Pinterest and my own files) to see what matched up.  Then I planned my meals for this week using those recipes.  The idea is that I will make the meal, but double or triple it so I have one for dinner and one or two for later.  Pretty clever, huh?

Yesterday we spent all day shopping and running errands.  There was a Target run in there, as well as a stop at Old Navy for some cheap flip flops to wear in the hospital shower.  We grabbed dinner before stopping for another paint sample from Home Depot.  We stopped to check out a children's consignment store because I still haven't found a going home outfit for Kelly, but they were closed.  We hit Joann for a replacement reusable cup for my husband because he left his on top of the car.  We were all over the place! Finally, after all that, we hit the grocery store where I discovered that I had forgotten my circulars at home so I wasn't going to be able to get all the stuff I price matched for.  PHOOEY!  We grabbed what was not on my price matching list and anything for which they had a better price anyway (one of the perks of listing the prices at all the competitors in one place) and called it good.  I figure I'll get the rest of the stuff later.

Bubba passed out in the car on the way home and since it was a good two or three hours earlier than when he normally goes to sleep, we were thinking GREAT.  Now he'll be up all night!  Nope.  He slept until 12:30 today!  I guess all the errands wore him out too, even though he got to sit in a cart for most of them.  Lucky.

Me?  I was awake.  Very awake.  So was my husband.  I decided to take advantage of the time by prepping the marinade for one of my meals.  I was doing Cilantro Lime Chicken (recipe here) and figured that instead of prepping one batch of marinade, I'd do four.  We'd eat one for dinner and have three stashed for after the baby arrives.  I was in a lot of pain by this point after two solid days of activity so my husband volunteered to help.  We put ingredients in Ziploc bags and added frozen chicken (which I bought in bags in the freezer section) to them before sealing.  The idea is that you pull one out the night before, then as they thaw in the fridge they chicken will marinate at the same time.  All we have to do is add some rice (which can also be made ahead of time and frozen) and a veggie, and dinner will be done in less time than it takes to order a pizza!

After we finished those, we divvied up a package of bacon.  Have you noticed how expensive bacon has gotten lately?  Especially if you like to use the good stuff.  It's crazy!  Also, a lot of recipes call for just a few slices.  What do you do with the rest?  You can't keep freezing and refreezing it.  If you cook it all up, then it's kind of wasteful, not to mention eating that much bacon is probably not good for you.

So, we opened the package of the lovely, thick cut Applewood Smoked bacon that we bought and separated  it.  I cut strips of parchment paper and folded them in half lengthwise.  We then tucked three slices into the fold, and folded the bacon/paper in half crosswise.  I took these little packages and tucked them inside another labeled Ziploc bag.  Now when I want to make something with a little bit of bacon, I can just pull out one of the little paper bundles and use what I need, rather than getting stuck with a whole package of bacon!  The parchment paper keeps them from freezing to each other so it's super simple.

After we finished with that, I looked at the clock and it was 2 am.  Now, I'm naturally a night owl, and an insomniac on top of that.  I also happened to have married a night owl who also insists he's rarely ever tired. Now you know why my kid is up until one or two am and sleeps until after noon!  It's in his genes!

Anyway, I asked him if he was up to doing one more meal prep thing.  He said all he had planned was to play video games, so sure, why not?  (I think he was excited at the prospect of good food with less work later on.)  I pulled out the packages of ground turkey that we bought and we got to work making meatballs.

152 meatballs, to be exact!

By just throwing all the ingredients into the KitchenAid, and then working together to scoop and shape the meatballs, we were able to make four batches of partially cooked turkey meatballs in record time!  After they cooled I divided them up into more labeled Ziploc bags (seriously - label  EVERYTHING if you're going to do this!) and popped them into the freezer.


I ended up with three bags containing about fifty meatballs each.  That sounds like a lot, but they're small meatballs and the soup I make with them usually lasts a few meals.  Since making the meatballs is about 2/3 of the work involved in this soup, we saved ourselves a ton of work somewhere down the line!

Later this week I plan to make some Baked Ziti to freeze, as well as frozen pizza dough and some chocolate chip cookie dough.  I may even try to get some bread dough in there so we can stop buying bread again.  We'll have to see how I'm feeling though, as today my body is paying for all the work of the past two days.

Totally worth it though.  :)

Labels: , , , , , ,

Wednesday, February 01, 2012

February Mish Mash

I know there are probably a lot of blog posts being written today that start with something along the lines of "I can't believe it's February already!!!"  I can.  January seemed really long to me for some reason, and I'm not sure why.  Since it is a new month though, it's time to revisit my goals for January and establish new ones for February.

Goal one - Take better care of myself

I went to Lush and bought myself some pretty smelling soaps.  I also replaced the crappy conditioner I was using with a better one and a conditioning treatment.  I can already see a difference in my hair!  I definitely shaved my legs more than twice and even used a self tanner a few times.  The polish on my nails is all chippy though.  Dang.

Goal two - Floss EVERY DAY.

Big fat FAIL.  I started off strong the first week and a half.  It was pretty cool because this time my gums only bled the first three days, not for a week and a half like last time I tried this.  Then I got sick, and all that flossing went by the wayside.  I never took it up again.  Why must this be so hard for me???

Goal three - Take off eye makeup before bed.

Again, this goal started out strong.  I bought some makeup remover wipes and I'd do it while I was watching television at night.  I missed a few nights, but I think I got it off more nights than I missed.  I need to work harder on this.

Goal four - Get organized!

I did really well on this.  I cleaned  out the bathroom medicine cabinets when I switched the  bathrooms, and I also cleaned out and organized under the bathroom sinks.  The pantry got an overhaul and cleaning out too.  It is no longer scary and I no longer drop crap on my head when I look for stuff.  It's nice!

Goal five - Eat more stuff that's good for me

I've definitely been doing better on this one.  My food aversions seem to have gone away for the most part.  I'm eating more regular food at home and have added in a lot of fruits and veggies that I was missing before. I can't even tell you how many clementines I've had!  I do think I need to start eating bananas (gross) though, 
because I've been waking up with my calves feeling very tight and I think that means my old friend Charley Horse may be ready to start making his visits soon.

Here are my goals for February:

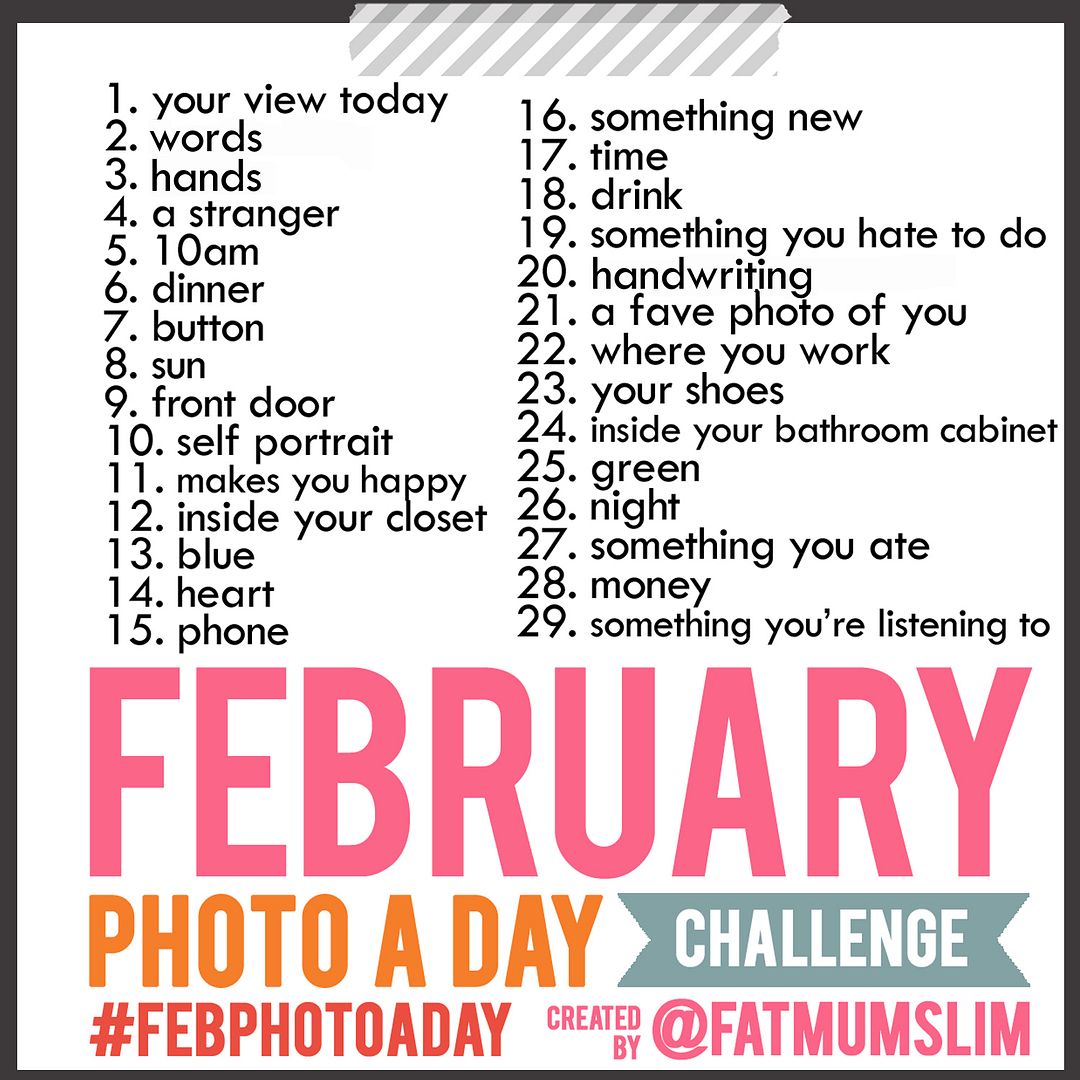
Goal one - Participate in the February Photo A Day Challenge.

All through January I kept seeing this little prompt pop up on Facebook and Twitter, but I ignored it at first.  After a while though, I thought it looked fun how people were putting their own interpretations on the prompts for each day.  I decided I'd try it for February.  At the very least it will help me to have more photos in my Project Life album, right?  Details here.


 Here's my photo for day one.


Don't worry - I don't plan on posting them each day.  I may just do it once a week.  I will be doing them all with Instagram.  You can follow me there - my name is splendidmissm.

Goal two - Work on the before bed routine for myself

This includes the flossing and makeup removal things.

Goal three - Clean out the misc. cupboard in the kitchen and swap it with the pots and pans cupboard.  I think they'll work better this way.  Also, we do NOT need that George Foreman grill anymore.  We haven't used it once since we moved in here!

Goal four - Finish the December Daily.  Really.  Get some printer ink and another package of photo paper and just do it already!

Also I wanted to note ...

I was 19 weeks on Sunday.  I started to feel the little baby flutter movements near the end of week 17.  By the end of last week, the kicks were more definite and would happen in little groups.  Last night, this baby was kicking hard enough that I could see it from the outside.  My husband saw it too.  She's just growing so fast in there!  I checked my blog archives (which is yet another reason why blogging is awesome) and I didn't see Bubba move until 23 weeks.  Crazy!


Last year I posted this photo of a very simple garland I made.  This year, I was too lazy to decorate for Valentine's day.  However, I would like to offer you those vintage Valentine printables again in case you'd like to make one for yourself.  Just "Like" my Facebook page to access the free downloads!


Labels: , , , , , , , ,

Monday, January 23, 2012

Project Life Update - Week of 1/15 to 1/21

I've been working on getting my Project Life stuff organized this week.  I haven't put a whole lot of work into it, but it's nice to have everything in one place when I go to work on my pages.


I got the idea to use this Ikea organizer from Pinterest, and luckily, I just happened to have one laying around!  Since I told myself I'm not going to buy anything for this beyond plain old page protectors, this will really help me to keep my stash of supplies for this reined in.  If it doesn't fit in here, I don't need it!


On the left, I have a section for scraps of patterned paper that I think will make nice filler cards, or embellishments to filler cards.  Toward the front I have journaling cards.


I spent some time this week browsing Pinterest for links to free journaling cards.  This picture shows a few of my favorites. Sure, you could buy the kit, or you could buy downloads, but if you're on a strict budget like I am, free cards that other crafty people are sharing are awesome!  If you want to see what I've found, check out my Project Life Idea board on Pinterest.  I have page inspiration, links to different design elements, and of course, all those freebies I've pinned.

I printed out my cards on plain white cardstock.  If you buy it at an office supply store, 110lb white cardstock in the 250 count package is waaaaay cheaper than getting it at a scrapbook store, and it's still acid free.  I just printed them, trimmed them, and then rounded the corners on a few.  I think I have a style for just about every occasion at this point.


Another thing I did was to sit down with my bag of patterned paper scraps and some blank white cards.  I just cut the cards from more white cardstock - nothing fancy.  Then I embellished them using various bits and pieces of patterned paper, sticker labels, and a few small embellishments.  Some are simple and some are a little more involved, but none of them took more than a few minutes to do.  I looked at some of the pages I had pinned for inspiration and ideas on what to do with these.


Sometimes you'll find that you have a blank spot on a page and nothing to fill it.  I've also found lots of free printables online that come in handy for this.  So what if they're too big?  Most are sized for photo frames to use as part of your decor, but with photo editing software it's no big deal to size them down to 3" x 4" to fit your pages.  You can use quotes, subway art, etc to help supplement your mood that week.  Also, how cool would it be to recreate some of the stuff you have in your house for your book?  I know not all of my printables will survive into the future otherwise and it would be fun to look back and say "OH!  I remember that!"


In the back of the center section I have larger journaling cards, along with larger bits of paper I may want to use later.


Again, these are all free printables that I found on Pinterest and you can find links to on my idea board there.


In the front section I have the "this week" bin.  Any ephemera or notes that I've filled out that need to be included go in here.  This way, when I go to work on a page, those things are ready to be mixed in with my photos.  I want to be sure to include plenty of bits and pieces of paper from every day life in there.  I know how much I like seeing what old packaging and logos looked like long ago, so maybe my grandkids will too.  Who knows?

This week I have part of the box from my lunch, stickers from all the clementines I ate one day, a business card from my OB visit, some of my Twitter statuses, and part of the wrapper from some frozen soup I tried for the first time.  The wrapper was washed VERY thoroughly and then stuck to a piece of cardstock before I trimmed it down and rounded the corners.  The box from the burger was actually pretty clean, but I did wipe down the inside with a baby wipe before sticking the pieces to my cardstock.


In the last section I have miscellaneous page embellishments.


In here I have things like labels, small rub ons, stickers, etc.

When I get to the end of the week, it's time to print some pictures.  My printer at home is being a turd, so I've been having to send them out to get printed.  I tried Target this week instead of Walgreens like I've been using, and totally regretted it.  My Target does NOT print nice photos!  Walgreens has been printing them dark, but I can fix that by just making them lighter in Photoshop before I send them off, no sweat.  Luckily since I only have been getting five to ten photos printed at a time I was only out of a couple of dollars.

One thing I do to save money is to print two 3" x 4" pictures on one 4" x 6" photo.  Ali Edwards did a video tutorial explaining how to do this, if you're wondering what the heck I'm talking about.  She used Photoshop Elements, while I'm using Photoshop CS3, but it's basically the same concept.  If I find that I have an odd number of photos when I go to print, I'll fill that spot with a title, or a quote, or even a pretty pattern that I've found online.  The one on the left is actually one of the iPhone backgrounds that Becky Higgins put on her website!

As soon as I get my photos home, I pull them all out and trim them.  Since I'm not using the page protectors, I need to trim 1/8 inch off two sides of my photos so they'll fit on the 12" x 12" page with a bit of the background page showing.  This goes for both the full 4" x 6" photos as well as the smaller 4" x 3" photos.


After all my pictures are trimmed, I lay them out on my table, along with anything from the "This Week" bin of my organizer.  I move them around until I like their placement and everything fits.  Any blank spaces get a journaling card, because of course documenting with words is just as important as photos!

Once everything is laid out, I stand back and look at the colors.  Is there any common thread through the items for my page as far as color goes?  This week I had a lot of reddish orange, but since that was the predominant color, I knew using it for my background would be overwhelming and somethings would be lost.  I did notice a bit of aqua in several photos, so I decided to go with that.


I lay all the items onto the sheet of cardstock and stick everything down.  After it's in place I add journaling.  If there isn't a space for it, then I add a label sticker directly onto the photo so that I can jot down a quick note about it, or add a date.


One of my favorite things this week was this mini Twitter feed.  I went back through my tweets from this past week and cut and pasted the ones that I felt related to this project into a Photoshop document.  From there, all I had to do was resize and add the Twitter logo to the top.  Easy!  I got the idea from Cathy Zielske, who actually did it with Facebook statuses instead of Twitter posts.


On this page, I decided that I didn't like the journaling card I originally selected so I swapped it out.  After I took this photo I used an old 7Gypsies roller stamp to add a row of teeny arrows in aquamarine ink to the top of it.  I also decided that the business card looked lost floating in that space, so I anchored it to a bit of patterned paper.  The photo of the boy in the lower left corner had the journaling added in Photoshop and printed right along with the photo, but the other ones had stickers put on them for notes.

So there is this week!  I have another freebie for you too:


Same as the last few - if you become a fan of my Facebook page, you'll have access to these whenever I add them.  This one is a nice big 4" x 6" size, but you could always cut it down to make smaller cards if you needed.  As always, this is free for you to use in your own personal books, but please do not sell or redistribute my work.

Also, it has been brought to my attention that if you try to access the hosting service I use through Facebook, it may give you that little pop up asking you to grant it "permissions."  Generally, when you click the link it takes you directly to the download page, and all you have to do is click the green DOWNLOAD button in the lower right corner of the screen. However, I don't know if you have to have a Scribd account in order to access it since I already had an account to upload.

I can tell you that my FB account is linked to my Scribd account (meaning I have granted it those "permissions") and has been for over a year and I've never had any problems or spam. I've done the same thing with my Pinterest too actually since I hate trying to remember passwords and it's just easier for me that way.  If you really really really still don't want to do that, you could try copying the URL and going directly to Scribd without clicking the link. Paste the URL in there or in a new window and see if that works. Hope that helps if you're having issues with it.

Finally, I want to say a million thanks to everyone who has pinned or repinned my stuff on Pinterest.  Since I added these documents to my Facebook page two days ago instead of linking directly to my blog like I used to do, I've gotten EIGHTY new likes!  That may not be a lot to some of the bigger blogs out there, but for a small blogger like me, that's amazing!  And in two days no less! Talk about making my day.  So thank you, thank you so much!  :)

Labels: , ,

Wednesday, September 07, 2011

Why does Dinner time come when I'm too tired to cook?

Seriously. For us at least, it's the meal that has the most prep and work involved. I used to know someone who, without fail, would start to lament about how much chopping she had to do for dinner prep every day at about three in the afternoon. She posted her "woe is me" missives probably about three times a week on Facebook. It was kind of ridiculous.

With a little bit of planning and forethought, you can still make meals containing veggies that need to be chopped and not have to spend hours in the kitchen every day. For instance, I like to add finely chopped carrots to meals because they go with a lot and are an easy way to add nutrition to things like pasta sauce. Unfortunately, I don't do this very often because finely chopping carrots is a big pain in the butt.

Solution? Take your carrots (I bought a big three pound bag when I went grocery shopping), peel, and chop them.

ALL of them. That's a lot of carrots!

Next, spread them out on a baking sheet. Try to get them as close to a single layer as possible.

Now just pop them in the freezer!

The next day, scrape your carrots (with a spatula; they'll probably be slightly frozen to the metal sheet) into a large Ziploc bag.

Stick the bag back into the freezer and you're done!

Now whenever I want to make something that I think should have some finely chopped carrots in it all I have to do is go into the freezer and scoop some out of the bag. Because I freeze them in a single layer on a baking sheet before bagging them, they're nice and loose and scoopable instead of being just a giant lump. So far I've done this for onions and bell peppers too. I still need to get some celery in there and then I'll have mirepoix whenever I want with minimal work. Kick butt.
Last time I was at Dollar Tree I spotted these little collapsible crates so I grabbed a few. My friend Suzy saw my birthday wishlist post about wanting a freezer for the garage, and wouldn't you know? She had a small upright freezer in HER garage that she wasn't using! We gave it a good cleaning and it works great. I put my crates in there tonight and they fit perfectly! They're the exact width of a quart sized Ziploc bag. I freeze my homemade chicken stock in those (flat) and then put the bags in the crate standing upright. This is such an improvement over the stack of baggies sliding around in there I had previously.

You can see that my half sheet pans fit perfectly on the top shelf. I'm going to try to keep that one open so I can freeze stuff on them, as well as having a space to freeze items like broth flat in bags. The next shelf has one crate with chicken stock and other flat-frozen liquids and one with my bags of chopped veggies. I tucked the bags containing the extra tortillas I made on Monday standing vertically between the crates.

The third shelf has one crate with packages of meat standing vertically, and one crate with random packages that aren't able to be stacked flat. Finally, on the very bottom, there is a bag of frozen chicken breasts, a pork butt roast, a spare bag of ice (our icemaker is broken, *sniff*), and the bowl to my ice cream maker. In the door are boxes of extra butter, a bag of shrimp, and some bags of corn on the cob bought when corn was on sale super cheap.

We keep stuff like frozen fruits and veggies, ice cream, and other random meals/meal components in the freezer part of our refrigerator. I love how much more room we have now and how organized it all feels! I think I need to get a couple of those crates for the refrigerator/freezer too now. They're going to make it a snap to do my inventory sheets, you know, when I get around to it.

Organizing is ADDICTING.

Labels:

Photobucket

©2008 Sara Madrigal Fehling. All rights reserved.

Please do not take my photos without permission.

Contact me! sara.fehling@gmail.com

Related Posts with Thumbnails