




Saturday, September 18, 2010

More Halloween Decor: The Cheese Dome Cloche

This is what my dining table looked like this afternoon. That's right folks - Miss M is officially a spray paint addict!

I spray painted a bunch of my thrift store find frames with black Krylon. Some of them were plastic, so in the interest of all of them matching I just used the Fusion paint for plastics on all of them. It costs more than the regular paint, but I need them to all be the same finish! I have two more larger oval frames that I've picked up this week as well that need painting. I'm thinking I might make silhouettes of myself and my husband to join the one of the baby I did before. I've run out of room on the wall I was using for these, so I think I'll move them to another, bigger wall in our apartment. Hooray for projects!

Speaking of projects...

I was reading a blog called Decor Chick and came across this super cute idea for an old cheese dome. She found the idea (I love how stuff like this gets spread from blog to blog!) on a blog called House of Hepworths. I had one of those "Why Didn't I Think Of That!" moments. I see those cheese domes at thrift stores all the time, but I would never buy them because wood is porous. Eww. The thought of putting my food where someone else's old food has been and not being able to clean it properly first just skeeves me out BAD. Therefore, they got passed over. Repeatedly.

A few days later, I found this on one of my Goodwill runs. It's a little beat up, but overall, I liked the shape and the size. I figured the little dings gave it character, right? After I scraped some wax off it, it was fine. It came home with me and was set aside to wait.

When I was out junking with my friend Susan last week, I came across a cheese dome. I liked the glass cloche, but the base was cracked and had a big chip missing from it. Although I will admit to having the "but what if I never find another one ever?" thought go through my head, it still ended up getting left on the shelf.

On Thursday night I had to take a class at church, and on my way home I decided to swing by a Goodwill that I had not visited before. There on a bottom shelf, I finally found it - my cheese dome! The base was way beat up with lots of knife scratches and the finish being worn off around the edges, but that didn't matter. As long as the wood was intact the finish was irrelevant. I was going to paint that bad boy!

Oh my goodness, I am so glad none of you had to smell the odor that came out of this thing when I untaped it to clean it the next day. Nasty, nasty, nasty stale old cheese smell, all greasy and rancid. For real. If you click on the photo of it you can see just how nasty and greasy the glass was. I gave the whole thing a good scrub, then when the wood was dried (that really only got wiped down) it got glued to the candle holder with some Gorilla Glue. After that had set, the whole thing got a coat of primer, followed by two coats of black spray paint, and then one coat of a color called oil rubbed bronze. This is a new to me discovery, and I'm in love. It gives just a subtle bit of metallic sheen that's really pretty and a lot more interesting visually than the flat look you can get a lot of times from spray paint. LOVE.

I picked up the little faux pumpkin (it has glitter crackle on it!) and a decorative floral pick at Hobby Lobby today. I didn't use everything that was on the pick, just enough to embellish inside my cloche. Isn't it just the cutest thing? I'm debating making it a tassel now. The stuff to fill the cloche ended up costing the same as the cloche itself did to make!

(That little bottle next to it? More info on that tomorrow!)

Here's the little cheese dome cloche on the dressers in our living room:

What's cool about this is that the pumpkin will look good in there until Thanksgiving, and then I can just change it out for whatever holidays come after! It's not a one trick decor pony! I found a second decanter at a Goodwill today that is keeping my first one company. I will have a bar tray one day with actual booze, LOL! You can see I already made one tassel for the apothecary jar holding Bubba's bribes jelly beans. You can find the directions for basic ones here and better directions, including how to make a twisted cord in the September 2010 issue of Martha Stewart Living.

I am noticing I need to re-do the alphabet strip for the boy too. My work here is never done!

Labels: ,

Saturday, September 17, 2011

The Accessory Closet and Another Cheese Dome Cloche

In our house, I'm lucky enough to have TWO linen closets. One is twice the size of the other. That one is where I house towels, napkins, extra toilet paper, sheets, etc. The smaller one is my "accessories" closet.

Since it's getting to feel a bit cooler around here, I've been itching to change things up a bit. I went in there to assess what I had and realized it was an unorganized mess! How did that happen? Of course, I was when I was in the middle of mowing the lawn the other day (I needed a break!) when this realization happened but it did not stop me from pulling everything out and putting it back again neatly.

Isn't this just the prettiest punch bowl? I got it for $8 at Goodwill and it came with 18 cups! It's super heavy. I love how even though it has clean, classic lines it's still a bit on the pretty side with the scalloped top. Now I just need to have a party! On this shelf I also have two different sizes of glass pitchers.

This shelf is apothecary jars and vases.

This one is various platters and candle/candle related items. My trifle bowl is in here too because I don't really have room in the kitchen for it. In the back corner is a silver plated water pitcher that I really should move to be with the other pitchers, now that I think about it!

While I was rooting around in there, I found that I had the pieces to make myself another cheese dome cloche. I posted about the first one I made last fall, which was based on a tutorial posted at House of Hepworths. I made a black one and a white one so I would have one for any occasion. Well, lately I've been thinking about maybe painting one green, but now I won't have to!

Honestly, I don't even remember buying these which is terrible really. I'm glad I did though. The cloches are super easy to make.

First, use a ruler and mark the center of the bottom of the base for the cheese dome.

Next, go find your friend Gorilla Glue in your adhesive drawer.

Then, lightly dampen both surfaces with a little water. Put a thin bead of glue around the top of the candlestick.

Place the candlestick where you marked the center of your base and weigh it down. The closest thing I found that was heavy enough was this houseplant, but hey, it worked! Just be sure the weight is on there evenly and not off to one side slightly like my pot was. My cloche may have ended up with a bit of a "gangsta lean" due to this. :) Let it sit for two hours to be sure it cures.

Now, just spray paint it! I painted mine brown first, then went over it with the green. Once it dried I sanded it lightly where it would wear naturally to give it a little bit of an aged look. After that I just gave it a quick clear coat and it was ready to display!


The glass on this one is a bit cloudier than the other two. I just stuck the old pocketwatch (it works!) in there for the photo, but I don't know what it will hold. One thing for sure - I sure do love these things. Thanks Allison!

Labels: ,

Wednesday, December 22, 2010

Christmas Decor 2010

Apparently, I'm going to be one of those people who keeps right on decorating up to Christmas. My friend Susan informed me that Christmas lasts until Epiphany though, which is January 6th (the twelfth day of Christmas), so I think I'm okay. I haven't done a "tour" of my decorations yet, so what the heck, right?

First off - this is my husband's Christmas gift to me. I told him to wrap it and he didn't, so I decorated it instead. HA!

It's a bee-YOU-tee-full milk glass pedestal dish in the lace edge pattern to match the plates and dessert compotes my friend Suzy gave me. I've admired this piece on other people's blogs but have never come across one in real life before. I about wet my pants when I saw this at Savers. I just think it's the prettiest thing.

Previously the ornaments were in a clear glass trifle dish. Upgrade!

This is the table in our entry. I showed the Hello Kitty tree before (I've recently added a pink star to the top!) but here is the little vignette next to it.

There is the frame that previously held vintage Halloween and Thanksgiving postcard reproductions (click here if you'd like a copy of those for yourself) and will soon hold a New Year's greeting. The milk bottle in the back is from an antique store in North Phoenix and is filled with a gold bead garland. The wooden trees I've had since I was eighteen, I think. At my first job as a teacher's aide, one of the teachers would organize craft days after school in the library for the staff. She would provide all the materials and we would get together to paint and decorate whatever the project was for that week. Needless to say, I loved those get togethers!

Here is one of the bookcases. The other one has the tree pretty much blocking it.

If you compare it to previous photos of my living room, you'll see that I finally managed to accessorize the top of the shelf properly! The stockings I made last year. On the top shelf in the right hand corner I tucked a glass apothecary bottle that I filled with a silver garland to bring a little shine to an otherwise dark area. It gives a nice little bit of height there too so I'll probably leave it after Christmas. There's a frame ornament on one of the stockings that I plan to fill with our family photo from this year, but I have yet to get around to it.

Here's the china hutch:

I owe a LOT of this to thrift stores! Father Christmas and the tiny tree are new additions this year to my decor. I put a strand of red Mardi Gras beads on the little tree for color. The cheese dome cloche that held a pumpkin for fall now houses glittery ornaments, as does the big apothecary jar.

I made a bunting for the top of the cabinet by just cutting out paper triangles with zig zag paper shapers and stapling the top corners together. I cut the word "★believe★" from silver glitter fun foam on the Sizzix machine. That stuff looks so cool when it's cut that way and it's even self adhesive!!!

The seraph is made from paper and I've had that since I was seventeen, I think. It may be the oldest piece of Christmas decor that I own. I bought it at this store called Old America that has long since gone out of business. The bottle I found for a dollar at Goodwill and just tucked some twigs inside.

After I took the first photo of the hutch I decided that I needed to decorate that bottom shelf because it looked sad After some rearranging and a little bit of playing with the glue gun I came up with this:

I really like how that compote looks with something in it, so I may have to get some fake fruit or something for after the holidays.


I had that cheese dome in my closet because I wanted to make a second cloche but hadn't found the perfect base yet. I dug out some teeny earring boxes that I bought at a paper store (Xpedx in Tempe for you locals) and hot glued some silver ribbon to it to make tiny gifts. I plopped those on a bed of fluffed up cotton balls, added a paper Making Memories poinsettia, made a little embellishment for the ribbon on the dome and bam! Done and super cute.

I tossed a few glitter ornaments in the urn and added a mini-tree topper for more color. It was a little short so I sat it on top of a mini-playdoh container that I wrapped in unrolled cotton balls. Ghetto, but effective.

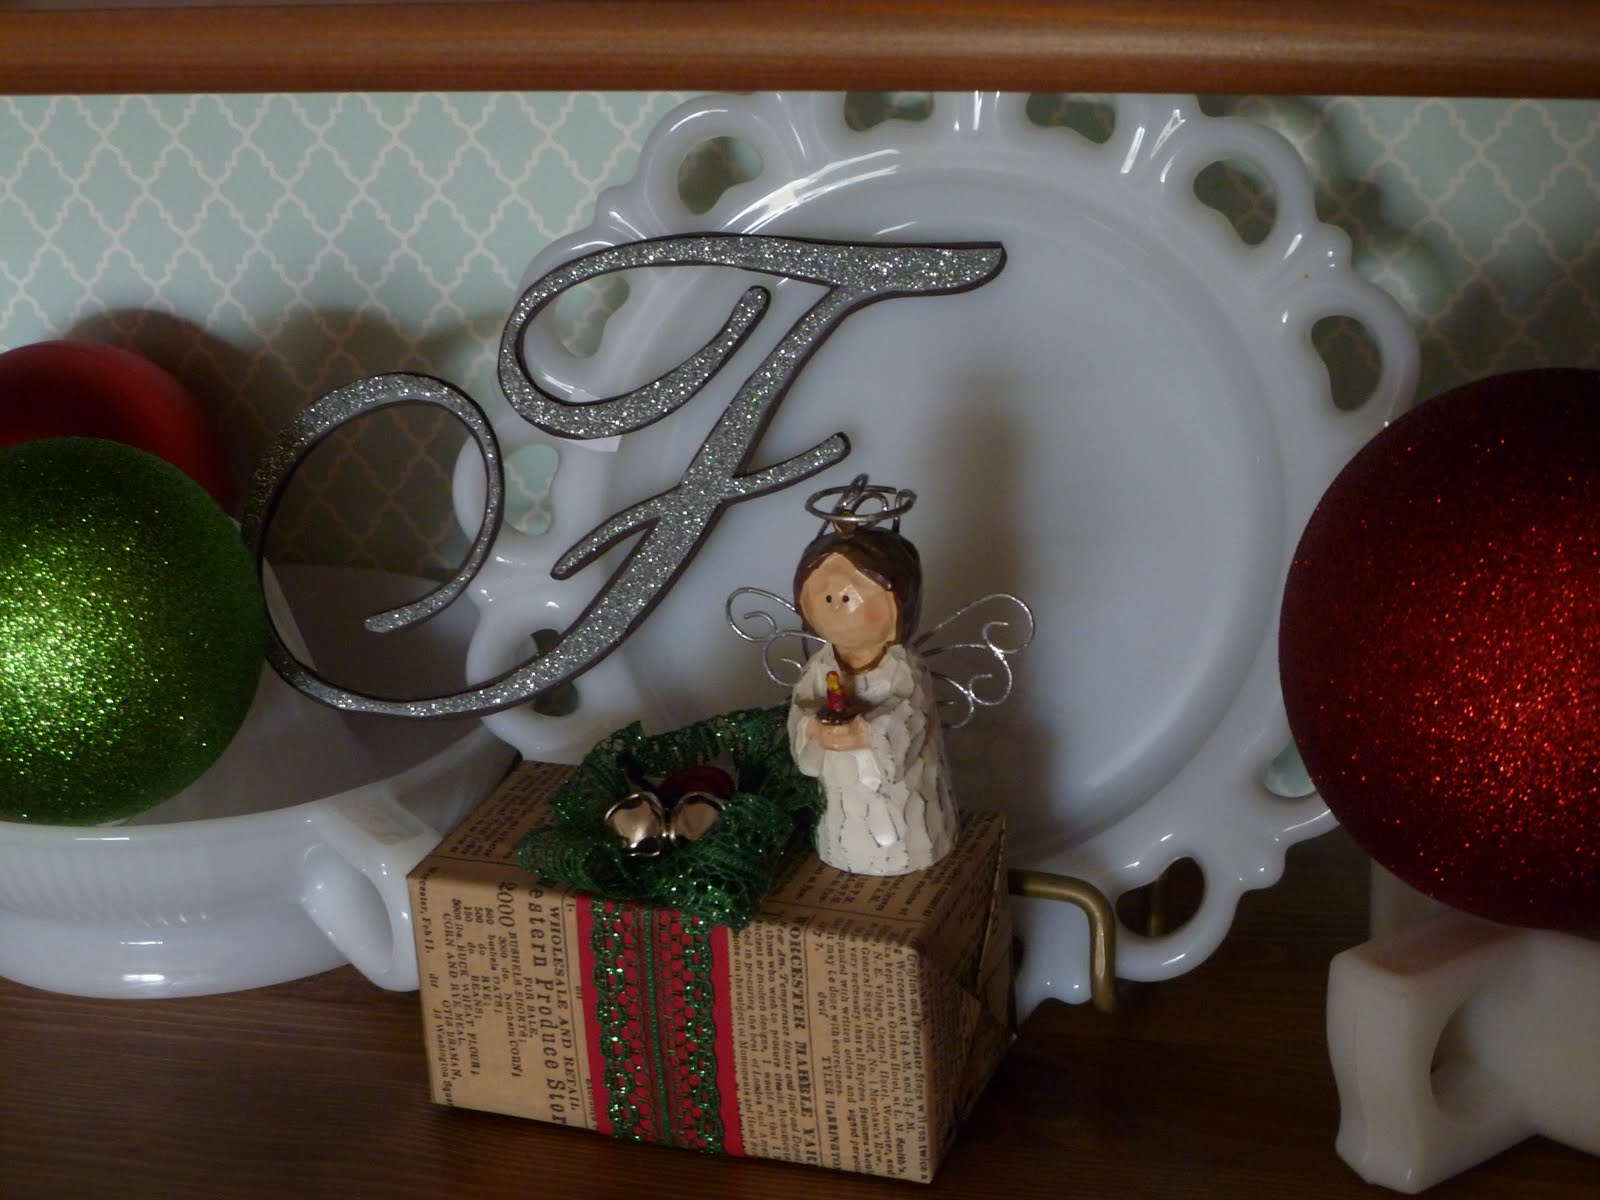
For this side, I started out with more glitter ornaments. I wrapped an empty Advil box with a piece of an old shopping bag, some cardstock, and vintage glitter lace. It's topped with a bow of the lace, a puffy star, a red button, and some jingle bells. The angel ornament was purchased in the gift shop at the second largest cross in the Western Hemisphere in Groom, Texas while on a road trip. The monogram was cut from more glitter fun foam and then mounted on some dark brown cardstock for stability and contrast. I have a feeling that will stay out long past Christmas!

On the bar to my kitchen I have a few more little things.

There are some extra ornaments that didn't fit in the pedestal dish/trifle dish, so I put them on the top level of that tower and embellished the big one with some ribbon. Then of course, you have to have clementines at Christmas, right? A few faux poinsettias and the ornament my friend Danea sent me on the candle holder I use as a mini cake pedestal for cookie photos, and this area is now nice and festive.

I was at the Goodwill by my mom's house the other day, and I found an actual cloche. I was super excited because I've been looking for one for a while. Even though it was tiny, I put it in my cart because it was only two bucks. They actually had about ten of them, but I was good and only brought one home with me.

Well, as I was standing at the sink washing it I happened to look up at that ornament on the pedestal and had an idea. I dried my cloche off really well and then set it carefully over the ornament. Perfect fit!!!

I put some white jimmies under the ornament and made the little "sweet" rosette for the ribbon. I love it so much! It just goes to show how you never know what you're going to find that works together with something you already had, even if you never considered it in the first place. There are always new ways to mix and match what you have. Also, how easy was it to go from cute (ornament on a stand) to awesome?

This is the door to the garage. I decorated this garland probably six or seven years ago, which is why the ornaments on it are 1. gold and 2. glass. I'm hoping I don't regret hanging that up! I just pull it out every year and fluff it.

Finally, my last bunting.

This is a terrible picture because I stink at taking photos out of a window of inside the house. You can see my curtain post for further evidence of this.

I got the idea from Ashley's blog. She just took some paper doilies and strung them together for a simple and pretty garland. I used Scotch tape and thread! Bubba calls them clouds.

Well, that's all that's up for now, but I will probably put up more things if I know me! I just can't leave well enough alone. :) I still want to do a bunting for over the mirror in the entryway but I don't know what I want it to say. Something about Jesus for sure. A child is born, perhaps? Suggestions welcome!

Today I'm making up more meat for tamales and some cookies. Hooray Christmas!

Labels:

Saturday, September 24, 2011

The Most Wonderful Time Of The Year

That's right - it's FALL, y'all!

I'm going to go ahead and ignore that the high for today on this lovely autumnal equinox is one hundred and four freaking degrees, and that's pretty much been the high (if not higher) for the past several months and will probably be the high for another few weeks. If I have to crank my AC and stick fake pumpkins all over my house so that I can celebrate the harvest season with the rest of the country, so be it.

The best part about fall, of course, is that it ushers in not only the cooler weather (can I get a Hallelujah???) but that it also heralds the beginning of the holiday season. I love this part of the year! So many things to make, and bake and experiences to enjoy! Lots of people Spring clean, but for me, I come alive and do all that in September. I've got my household binder to help me stay on the ball. We finally picked paint colors for the living room and started the painful process of priming the poop brown walls (really, who thought that was a good idea?) in the kitchen. My fall garden is mostly planted.

Life is GOOD, y'all.

This week I started hauling out my fall decor. Okay, I guess hauling is a bit over-dramatic. I only have one bin of stuff, because if you recall, we've been in an apartment with NO storage before this year! I'm sure as we live here my collection of stuff will grow. In the mean time, I can work with what I have and that includes my creativity! Expect to see some fall/Halloween decor posts from me in the next few weeks.

We'll start with my hutch:

You can see the new wall color in the background. It's a very pale, cool blue. I also changed out the drapes framing the patio door from a steely gray-blue to a nice, solid navy. I like how the white molding and navy curtains really stand out from the wall with the new color now. The oranges and the greens in the hutch play along with them nicely too, I think.

I'll describe what's on the shelves, starting from the bottom. Click on any photo to enlarge it.

Bottom shelf - two milk glass cake stands, a large milk glass platter (all gifts from my friend Suzy), a fake pumpkin, a stone frog (a gift from my friend Brian), a pumpkin plate that I picked up at the grocery store last year, our framed monogram (cut with the Silhouette using the Monogram KK font) and decorated with a teeny fabric bunting, and an apothecary jar full of candy corn.

Confession? The candy corn is from last year. That stuff is GROSS. I don't know how people eat it, but it sure looks pretty in a seasonal display, doesn't it? I just put it in a baggie and saved it to use again.

The middle three shelves, from top to bottom:

Top - Glass candy jar full of Dollar Tree skulls and a label that I made last year. I opted to leave the liquid out this year. Little PartyLite leaf votive holder (part of the Whispering Leaves Trio) I bought at the neighbor's yard sale for a quarter. A pair of small milk glass urns flanking a milk glass dish holding Horatio the Dollar Tree glitter skull (from last year) and some fake apples (clearance! at Fresh & Easy of all places). The arsenic bottle I did last year, along with a vintage reproduction Halloween postcard in a small frame.

The fabric bunting is just little triangles of fabric cut with pinking shears and hot glued to ribbon. I stuck it up there using Glue Dots.

Middle shelf - a pair of milk glass vases at either end, the other two PartyLite leaf votive holders from my neighbor's yard sale, a purple metal star from the Target dollar spot last year, a milk glass compote with Spanish moss and a faux pumpkin (I just pulled it off a floral pick) from Hobby Lobby, my green cheese dome cloche styled with the stuff from last year's cloche, two leather-bound books (The Classics of Horror and Ghosts), and a swirly faux pumpkin that I found at Goodwill. I like that pumpkin because it has "Give Thanks" carved into the other side, so after Halloween I can just turn it around!

Bottom shelf - A stack of my favorite milk glass bubble bowls, two old books (David Copperfield and an old Roget's Thesaurus from Goodwill), a smaller stack of mini bubble bowls, my shrinking potion victim (again, left out the liquid this year), the sugar and creamer to match the bubble bowls, our monogram under a mini-cloche which I set on top of a saucer from my china set, and a milk glass compote filled with stones, twig balls, and a faux resin pumpkin that I picked up at Hobby Lobby last week. They look just like the mini ones you can buy at the grocery store, only you can save them and reuse them every year! No waste!

The very top of the hutch has a milk glass compote (Fenton, to match the ruffled cake plate, also from my friend Suzy for my birthday this year) with an orange planter inside that I found at Goodwill, an apothecary jar holding candy pumpkins, a framed vintage ad for Milky Way with a Halloween theme that I found online and just printed out, a silver framed mirror from Goodwill ($3!!!), an apothecary jar with dowels I cut short, painted black, and hot glued white ribbon around to make fake candy sticks, an apothecary jar with some pine cones and fake acorns (we don't have real ones around here) that are sold at Walmart with the Better Homes and Gardens stuff, an empty apothecary jar (I want to fill it with candy eyeballs, if I can find them), an apothecary jar filled with green beach glass I found at Goodwill, a black birdcage found on clearance at Target containing a silver candle holder (Goodwill) holding a faux pumpkin (another Hobby Lobby floral pick, minus the pick), and topped with a fake crow from the Dollar Tree.

All of the apothecary jars came from Goodwill, and most of them have little tassels hanging on them that I made using Martha's directions. The letter F monogram under the cloche is mostly chipboard and Stickles glitter glue, with some orange crepe paper for fun. It's exactly as wide as the cloche is, so it tucked in there nicely and holds itself up. That mini-cloche came from Goodwill too, as did my china.

Here's a terrible backlit photo of the "sofa table" which is really just an Expedit turned on it's side:

I didn't want to put a bunch of stuff on here because the boy can reach it, so it's pretty much the same as it's been. I added that handled urn (Deseret Industries, $2!) and filled it with Spanish moss from the dollar store, a $3 fake pumpkin from Target, and another Dollar Tree Crow. Nice and simple. Honestly, with the mess that Spanish moss makes, I don't think I could have handled anything more complicated!

Be sure to check back for some other things that I have up my sleeve! I may have lost my mantel in the move, but I have no shortage of things I can decorate.


The Lettered Cottage


House of Hepworths

Home Stories A2Z

Labels: ,

Sunday, September 19, 2010

Custom Arsenic Bottle

Remember the grubby little bottle that I picked up while out junking with my friend Susan last Wednesday?

I had PLANS for that bottle, my friends! The first thing I had to do was figure out how to clean it. None of my bottle brushes worked in that opening. I finally ended up putting a little bit of uncooked rice in there along with a squirt of dish soap and then shaking the heck out of it. It got the dirt out but there were still a lot of hard water deposits or something in there. I filled it with straight white vinegar, then set it inside a glass filled with more vinegar to cover and left it to soak overnight. In the morning I shoved a couple of cotton rounds in there and used a bamboo skewer to move them around and clean out the last of the yuck from in there. A good rinse and dry and my bottle was ready for some crafting!

I posted a peek of it on my cheese dome cloche post yesterday:

Here's a close up:

I searched Google for "vintage poison label" until I found one that I liked. Unfortunately, it was blue and red, so I messed with it in Photoshop until it was more to my liking. Since I was in Photoshop anyway, I changed the name of the drug store to our name and also the city to where we live. I think it was originally somewhere in Alabama.

The label was printed out on plain printer paper. I used a stipple brush to add some Distress Inks to it, starting with the lightest color and finishing with a darker one so that it would have more depth of color and look like it was genuinely old. I ended up using four different colors - Old Paper, Antique Linen, Tea Dye, and Vintage Photo, in that order. I cut it out after I was done inking it and ran it through my Xyron with repositionable adhesive. This way if I get tired of this it will be easy to peel off and put something else in it's place.

I bought a little bag of corks for $2 at Michael's. What a racket! That's what I paid for the bottle! I suppose I still have some corks leftover for other things, but still... it's the principle of the matter, you know? The cork was too new looking, so I hit it with the stipple brush and more of the Vintage Photo distress ink.

I didn't want the bottle to be empty, so I dumped in a 99 cent tube of silver glitter that I also grabbed at Michael's when I was there for the corks. That means this custom designed, personalized bit of decor, complete with vintage bottle, only cost me five bucks. Kick butt!

Remember, if you see anything you like here that I've made that you want for yourself, just drop me an email. I only charge a few bucks for services like altering labels to personalize them, then you can print as many as you like.

Labels: ,

Saturday, January 01, 2005

Tutorials

Photobucket

©2008 Sara Madrigal Fehling. All rights reserved.

Please do not take my photos without permission.

Contact me! sara.fehling@gmail.com

Related Posts with Thumbnails