Friday, May 30, 2014

Preschool is OVER!

We made it!  Bubba got through his first year of school with no major incidents and only a few minor ones.  His teachers have been great and I wanted to send a little "Thank You" to them.  Same as with my Christmas gifts, I wanted to avoid food products and gift cards.  I've seen several different versions of this idea on Pinterest, but I put my own twist on this.  I wanted to keep it simple and good quality.  This is what I came up with:


I got a couple of mason jars (no shortage of those here!) and decided to fill it with orange paper shreds/gift filler.  The problem?  I couldn't find that stuff in orange ANYWHERE!  Finally I gave up searching and just bought orange gift tissue.  I took out two sheets, folded them back up, and cut them into thin slivers with my paper trimmer.  Then I took the pile of sliced tissue and just separated it with my fingertips.  Easy peasy, inexpensive, and I have most of the package leftover to use for something else.

In the jars I put a tube of L'Occitane Passionate Jasmine Shea Butter hand cream and a bottle of orange Essie nail polish. I cut a circle of patterned paper from the Doodlebug Happy Harvest 6" x 6" pad (the Fall Flowers double sided cardstock) for each jar and also two circles of orange cardstock in slightly different shades using a die cutter and wafer dies. (Um... when did QK become WRMK???  Totally out of the look here!!!) I used a ruler to draw the lines for the orange sections on the back of the darker shade and cut them out with my X-Acto knife.  I then glued it to the top of the other cardstock circle and used a blending tool to apply Distress Ink in Spiced Marmalade to the edges. I punched a few hearts using the Stampin' Up Owl punch (that my neighbor kindly loaned me - DANG I need one of these things!!!) from a third color of orange cardstock. I cut the hearts in half to make the seeds.

For the bird I used the smaller of the Spellbinders Mixed Media Birds One dies.  I cut them from a blue paper that coordinated with my patterned paper and inked the edges using a blending tool and Distress Ink in Salty Ocean.  I outlined the bird and its wing with a fine tipped black pen and also used that to draw its eye.  I added a tiny dot of white ink with a gel pen to give the eye dimension.

I typed up my sentiment in Photoshop and printed it on white cardstock.  I trimmed it, adding the little flag to one side.  I glued the bird to one side of the banner and adhered it to my orange slice with foam squares for dimension. A little ribbon to tie it to the jar ring and BOOM!  Done. I made one for his teacher and one for her aide.

Kindergarten in two months!!!  ACK!  Where has the time gone?

Labels: , ,

Tuesday, May 28, 2013

Birthday Cards for Days!

I've always wanted to be one of those people who sends all their friends cards on their birthdays.  I know how much I love to get mail - especially fun stuff like cards!  However, I am sort of unorganized for that sort of thing.  Also, I am too cheap to buy cards.  With the amount of paper and paper crafting stuff in my house, it would just be wrong!  

However, after this weekend, I am all stocked up on cards!  Once again I hit up my Pinterest inspiration boards and got to work today.  Now all I have to do is remember to actually mail these.  :)


I bought this stamp today at Hobby Lobby.  They had a bunch of them for 50% off today!  I got her and a large chevron background stamp.  The Paper Studio embossing folders were 50% off too so I grabbed four.  The design for this card was inspired by this one.  I watched a video on Kristina Werner's blog and came to the realization that I had been using my watercolor pencils all wrong.  I colored this image using my new-found knowledge and I just love it!


I picked up a few more rolls of washi tape this weekend, including two rolls of the CUTEST Hello Kitty washi!  I made this card inspired by one of these.  Very quick and simple.  The sentiment is one of those dollar stamps from Michael's.


Gotta have some gender-neutral ones in the stash, right?  The inspiration for this card can be found here.


I think this card is so pretty.  It has a soft sort of vintage feel to it.  I used a few different colors of Distress Ink and a stippling brush to age the edges of the paper.  The heart was cut freehand from a Starbucks cup sleeve!  The insides are the perfect corrugated texture.  I'd never use it in a scrapbook because it's not acid free, but with cards I feel like anything goes.  The card I used as the jumping point for this one is here.


Here is the same image from the first card, only colored in slightly differently.  I loved all the colors in this card so much that I actually didn't put it in my stash, but rather hung it up in my craft room.  The flags are washi on white cardstock that I cut a border around.  I got the idea for this one from here.  This is the only one that I didn't make doubles of, which is too bad because it's my favorite.


Another gender-neutral card!  I love the simplicity of this, but I think I need a bigger star punch.  The original can be seen here.


This was the last one I made.  I was going to go to bed, but then I saw this and next thing I knew I had busted out the sticker tweezers for those little letters.This is another fairly simple card, but I think it's cute.  My inspiration card can be seen here.

And that's it!  My three day weekend is over and I have to go back to work tomorrow (HAHAHA) because my husband won't be here to distract little people.  This has been the best weekend I've had in ages.  I got to go shopping for some fun new supplies, got in a little one on one time with each of my kids, got to play with paper and ink, visited Starbucks TWICE, got plenty of rest and just was pretty happy in general.  My husband is so awesome for letting me take this time.  I'm a lucky girl.  :)

Labels: , , ,

Sunday, May 26, 2013

Birthday Cards

I really want to get back into my scrapbooking and paper crafting groove again.  My husband and I talked about it, because if I'm in my room working on a project that means it's up to him to watch both children.  He said he's okay with that, because creating is what seems to make me happiest and more balanced.  I think I have to agree.  I've always enjoyed my creativity, and these past few months I just haven't been making time for that therapy.  Especially now that I don't have knitting club anymore and I've stopped going to physical therapy twice a week, I am going to need some alone time.

Of course, I'm all sorts of rusty.  It's been a while!  I decided today that I'd start off by making a few birthday cards to have on hand.  You can always use birthday cards, right?  

I turned to my Pinterest boards for inspiration.  Honestly, if it's been a while, I find the easiest way to get back into the groove of things is to just scraplift something that someone else has done.  It's kind of like priming a pump for me.  I need to have a game plan in place while I reacquaint myself with the supplies.

I ended up making two each of four designs.


This one was inspired by this card.  The center is raised slightly on pop dots, giving it a frame effect that's kind of hard to see in this photo.  It's just a couple of strips of washi tape at an angle, a stamped sentiment, and a flower punched from cardstock with a pearl center.  BOOM.  Done.  Nice and quick.


The design for this card was inspired by this one.  I have had this Stampin' Up set for YEARS (it was retired in 2002) and have never, not even one time, used it before tonight.  Terrible.


This card was inspired by this one.  (Man, I had to HUNT to find the proper link.  What's up with people not knowing how to Pin properly???) I need a new white stamp pad.  I have a Staz-On one and it was all dried out.  I reinked it, but it's sort of sticky and I can't remember if that's how it was when I bought it.


This card was modeled off this one.  I really got some use out of my washi tape tonight!  I left off the butterfly so that it would look more masculine.

That's it for tonight.  Hopefully I'll have some stuff to share later in the week too!

Labels: ,

Sunday, November 13, 2011

Twelve of 12 - November 2011

Okay, first off, how the heck is it NOVEMBER already? I was typing in my post title and it pretty much shocked me. I mean, I guess I know it's November. Christmas decorations are up, we've started thinking about Christmas gifts, and this morning the boy told me that we needed a Christmas tree. As cliche as it sounds, this year has just FLOWN by.

Second - I stunk at taking photos this month. I didn't get all twelve, but here's what I managed.

1. This woman BEDAZZLED her license plate. My first thought upon seeing this was, "Is that even legal?" which was quickly followed by, "Oooh, I should do that!!!" I will admit that I struggled with whether or not I should post this photo, because it is of someone's license plate, but then I figured EVERYONE can see it when she's driving or in a parking lot like I did, so posting it here isn't really blowing her cover or anything. Besides, if she didn't want people looking at it, she wouldn't have bedazzled it, right?

2. We attended a birthday party yesterday, and in true Fehling fashion I waited until the very last minute to get a gift. This meant we had to run to Toys R Us, and then to Target to get a gift bag. Every time Bubba sees a camera pointed in his direction these days he puts on this weird cheese grin. Silly boy.

3. I also waited until the very last minute to make a card. It came out cute!

4. The party was at one of those gymnastics places. It was awesome because they didn't try to do too many structured activities. There were a few, but there was plenty of free play too. You like how Bubba matches the foam blocks almost perfectly?

One of the other moms remarked that Bubba was a natural when it came to leaping in and jumping across the foam pit. I told her it was because he practices every day on my sofa!!! Seriously, this kid has spent more time in time out for jumping on the couch than anything else in the last six months. Standing on the edge and taking flying leaps into the blocks with no one yelling at him was like a dream come true.

5. There was also a long, narrow trampoline that ended in... you guessed it - a foam pit! The kids would hop down the length and then leap off the end into the pit where one of the workers would lift them out again.

6. My child. I really don't like to wear socks without shoes, and neither does he. :)

7. Having pizza with the birthday girl. He actually ate almost a whole slice! That's a really big deal because normally he'll take one bite, if he even bothers to try it. He also ate some cake, but that's not really shocking.

8. We dragged the down comforter off the bed and into the living room so we could snuggle under it on the couch. Why have I never thought of this before??? It was AWESOME! Originally the plan was to watch Harry Potter, but the dvd was not only not the widescreen version that it said it was on the box, it was so scratched that it just would not play so back to Blockbuster it went.

9. On the way back from the video store my husband stopped and got me a drink from Starbucks. I love the Salted Caramel Mocha Frappucinos but have sworn off caffeine for my pregnancy. I did it for Bubba, so it's the least I can do for Finn, you know? Well, he figured out that they have a version with no coffee. It's a Salted Caramel Chocolate Frappuccino. It's not quite as good as the mocha, of course, but not bad when you want a sweet treat.

I shared it with Bubba while we watched South Park. Yes, I am a terrible parent. ;)

10. The boy got put into time out for jumping on the couch. I guess he didn't get it all out of his system at the party.

You send him to time out and he goes willingly, but then he gets all dramatic after being there half a minute, flings himself face down onto the rug and begins to fake wail. It's really annoying actually.

That's pretty much all I had. Next month should be better!

Labels: , , , , ,

Saturday, June 19, 2010

Paper and String

Well, yarn to be exact. Here's what I've been up to the past few days. First of all, I was invited to a baby shower today, and of course, with me being me and all, I forgot to make a card until the very last minute. This morning found me playing with paper and stamps pretty much right up until it was time to leave.

This card took TWO HOURS!!! Let this be a quick lesson in just why it bothers me when people are always telling me that I should sell my work. Let's not even take into account the cost of materials, which really, were just papers out of my scrap bin, a pen, some adhesive, and a sheet of white cardstock. If you paid me minimum wage just for the two hours it took to make this, you'd be paying $14.50 for a greeting card. That's insane. So sure, someone would want to buy this, but they totally wouldn't want to give me what the work was worth. It's not in me to make shoddy work just to cut costs/time so I can make a buck. I have to do the job to the best of my ability, always. This is why I'll always be poor, I think!

I came across a card like this online somewhere, but of course, it wasn't handmade. It was just a regular greeting card. I recreated it using scraps of various patterned paper on which I either sketched things freehand, or even better, just eyeballed as I cut. I sketched on the ink details with a Zig Millenium pen. I also learned today that the only black stamp pad that I own is a Staz-On pad, which no es bueno. I had to creatively rearrange the wording on the front because my card was smaller than the original. I changed up some of the colors to work with what scraps I had too. I love this card. I think it's the best one I've ever made.

I also made my first scrapbook layout this year, not counting the stuff in the December Daily. Isn't that terrible? I mean, at this point, the DOGS have better baby books than my child. Granted, the dogs are a lot less work to look after, but still. It's sad.

The photos in this layout were all taken by my little man, who is fascinated with the camera. I don't let him play with it anymore though because he keeps getting his grubby little fingerprints all over the lens. Since it's just a point and shoot, it's a pain to clean.

This was kind of awesome, because I was checking out the copyright dates on the borders of the papers I used. I used one dated 2005 and one dated 2001!!! I also used some ancient Gin X rub ons and some Quickutz dies that haven't seen the light of day in ages.

This is the red wall in my kitchen. While I've enjoyed the red wall in my kitchen, I've been itching for a change lately. Apparently, the whole world has gone crazy for the combination of turquoise and red, and I am no exception. Here I thought I was being original too! So my thought is that I'll paint over that red wall and make a new window valance. Eventually, I'd like to paint my kitchen chairs a bright red, the base of the table white, and stain the top a super dark brown. Since in order to do that I need to first buy a sander, and to buy a sander you need some money, it's going to have to wait a while. What I could do though, was make chair pads.

I've been looking through a photo pool on Flickr called Interior Styling, and one thing that kept popping out at me over and over again were pillows made from granny squares. In a modern or contemporary room, they looked surprisingly good. I decided to make the chair pads this way using acrylic yarn because I figured it would be easy to spot clean. Besides, if I decide I don't like them I'm only out of a few dollars because acrylic yarn is CHEAP! (it's actually only $2.59 at Hobby Lobby)

The chair pads look kind of small to me, but that's the standard sized (14" x 14") foam insert for them. I think this will look really cute when the chairs are finally painted the red to match the cushions.

Now, I'm off to try and get that Staz-On off my alphabet stamps and maybe to take a nap.

Labels: , , , , , ,

Wednesday, June 09, 2010

Austin Junk

While we were in Austin, I had a chance to check out a few vintage shops, antique stores, and thrift shops. Y'all know how much I like to look through other people's old crap! HA! The first one that we went to may have been the most interesting. It was called Uncommon Objects and had a LOT of offbeat stuff.

I picked up this little flower frog for $8. That's so much cheaper than I've seen them around here! Not only that, but they had a lot of them, in all sorts of sizes and shapes too. It's really heavy though, and those spikes are sharp, so I'm terrified I'm going to drop it and then try to instinctively grab at it.

The card I made today. Actually, I made a bunch of them because Sawyer got some gifts recently and I need to get them out! I totally got the idea from my friend Susan, who got it from an email she got from Hero Arts.

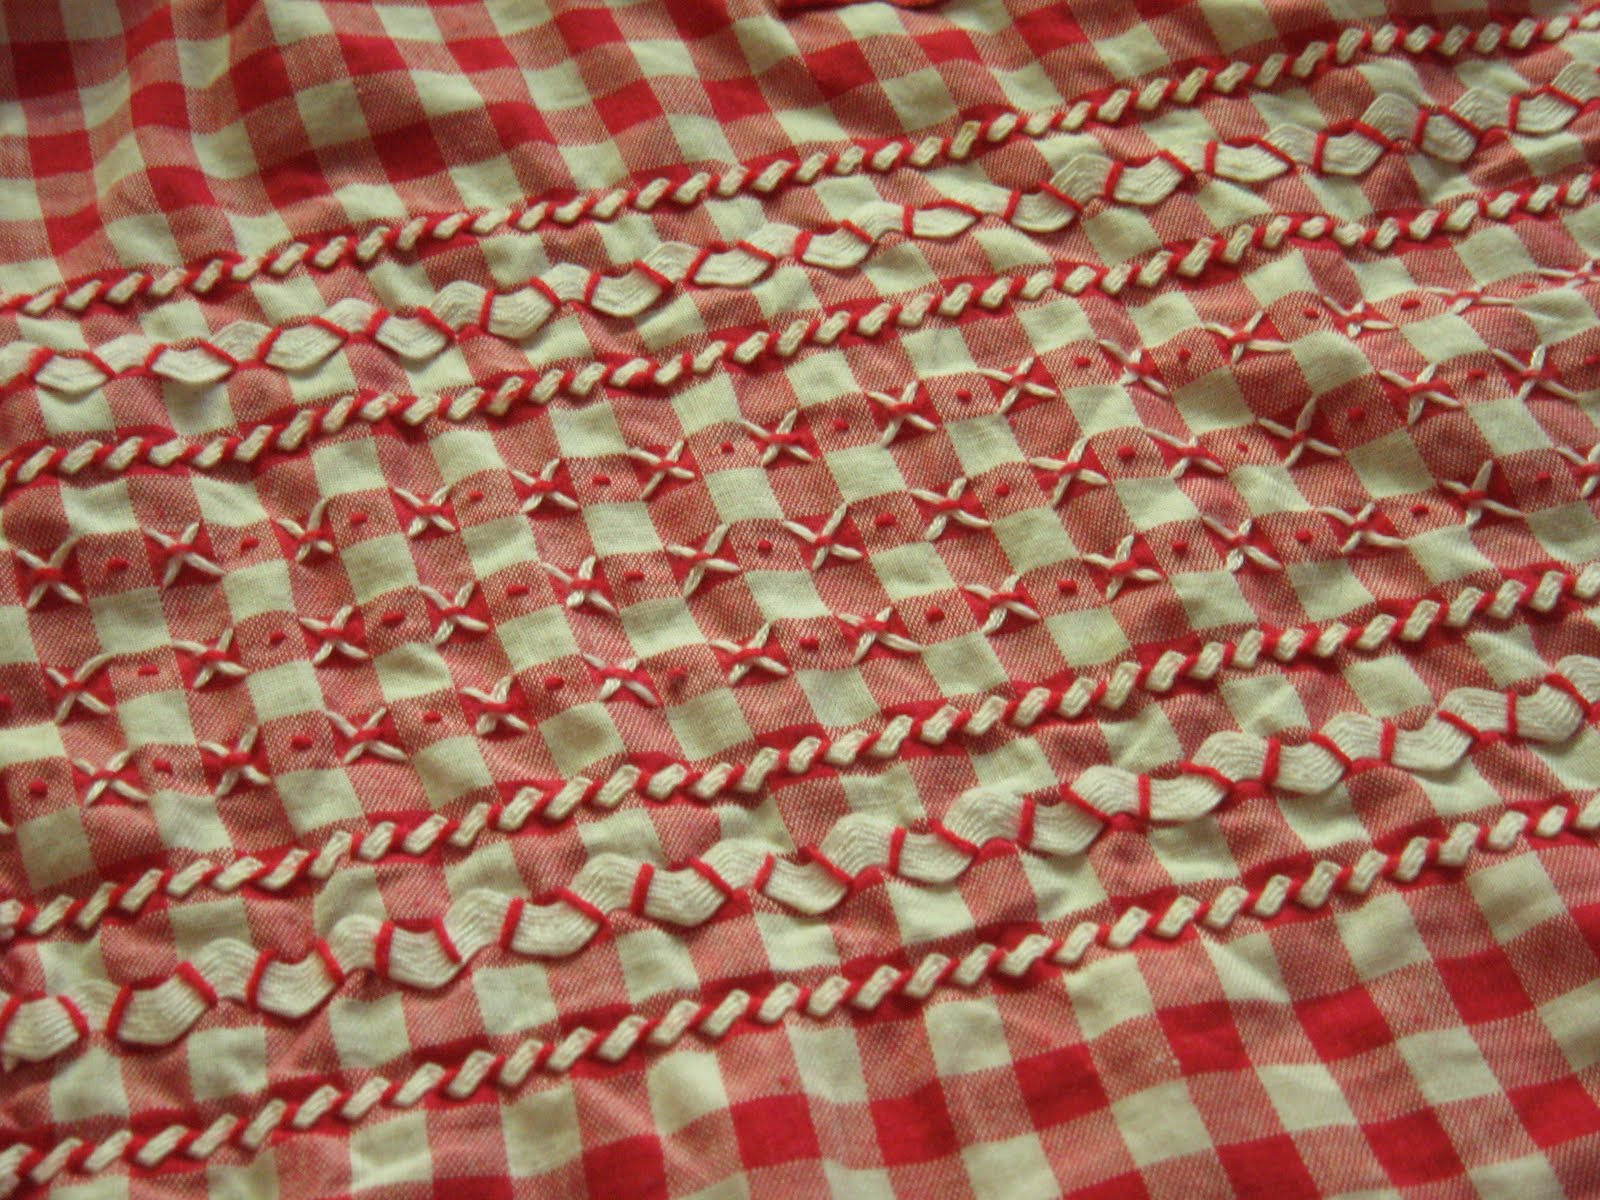
We checked out few more vintage stores outside of downtown. I found this cute vintage apron at one called Hog Wild for a mere $12. We had stopped at one called Room Service that I found in a Guide to Local Businesses that was in our guest house, and happened to see Hog Wild across the street.
It's all hand embroidered and sewn by hand. I loved what they did with the two sizes of rick rack, and how sweet is that red gingham? I just think that it's so much fun to go into those stores and see stuff that you remember from when you were a kid.

This lovely I spotted in the window of a shop called Flashback that was next door to where we had breakfast one day. I went in and was greeted by a serious treasure trove of vintage clothes and accessories. If you could wear it, they probably had it there. I was sad that most of them were teeny tiny sizes. The antique metal F wasn't priced, but the owner sold it to me for just $5. She also told me a funny story about a wasp sting. You had to be there. :)

We drove by this place called Out of the Past and stopped because it had a lot of cool looking stuff outside in the parking lot. Holy crap was I totally not expecting what I saw when we stepped inside. See that photo? This place was HUGE and full of narrow aisles made of old bookshelves and random furniture, each piled as full as you see here. Stuff was casually sorted into sections - such as the toys were mostly all together, the Fiestaware was mostly all together, the milk glass was mostly all together, the records were mostly all together... you get the idea.

Nothing here had a price tag, which I found to be very frustrating. Very rarely do I see an object that I have to have regardless of the price. I like to use the price as a gauge of how bad I really want the item! It was a total pain every time I found something interesting to have to go find the shopkeeper and ask her "how much" and watch her pull a number out of the air. Usually, it was a number too high for my cheap self, which meant that I then had to take the item back to where I found it and figure out how to get it wedged back into it's pile without causing an avalanche.

This was the front counter. The photo does not do it justice, I swear. I love the sign that tells you not to touch or it will all fall down. This place was just insane!

I did leave with two things though. First, I got this typesetter's drawer. I've never seen one this small before and it was only $8. The full size ones are usually around $35. I want to do something like this with it. I also ended up buying a toy metal car for some baby who refused to leave without it. The doors and trunk opened so he was smitten. That set me back $3, but since he had found a dollar at Target earlier in the day, I figured he chipped in some.

Finally, we stopped at a place called Thrift Land. It had the usual stuff you'd expect to find in a thrift store. They had some filigree edged milk glass dishes but they were poorly made. The molds didn't leave clean edges and those were kind of sharp, which was a bummer. I ended up leaving with a milk glass Pyrex pie plate to match the one my friend Suzy gave me as a gift, and this sweet little mirrored tray. I wish I had a bunch of pretty perfume bottles to put on it, but I only ever buy one bottle of perfume at a time. I put some lotion and a mini-tiara on it instead! I just think it's so pretty and girly.

I had really wanted to find one of those metal 3-d stars that people put on their houses up there, but the only place I came across them was at Out of the Past and she wanted too much for them. Hers were all rusty too and I think I'd like to paint mine. Ah well, maybe next time!

Labels: , ,

Monday, March 15, 2010

Make Your Own Monogrammed Note Cards

Last week I had a few thank you cards that I needed to mail out. Normally, I pull out all my scrapbooking stuff and make really elaborate cards when I need one, but I just wasn't feeling up to it that day. Instead, I decided to make a simple embossed note card.

First, you're going to need an envelope. You can make your own envelopes, if you are so inclined, but I am lazy. That means I buy my envelopes at the Walmarts. I like to buy plain white ones that will go with everything. I got this box of 50 for just a few bucks and it will last me a while.

Now, go ahead and take out a sheet of cardstock. It can be textured if you like (mine was) but just remember, lighter colors do work better for this.

Fold it in half, then use a bone folder to really flatten the fold and make it crisp. Cut the folded cardstock so that you have a card that is 1/4 inch smaller than your envelopes. My envelopes were 4 3/4" by 6 1/2" so I cut my card to 4 1/2" by 6 1/4". Just remember not to cut off the side with the fold!


The next thing you're going to want to do is find yourself a piece of thin chipboard. It can be part of a cereal box, the back of a notepad - it doesn't really matter. It's going to be a tool and not part of your finished project.

Cut the chipboard one half inch smaller on each edge than the dimensions of your card. Since my card was 4 1/2" by 6 1/4", I cut my chipboard to 3 1/2" by 5 1/4".

Now you need to find a letter to make into your monogram. It's best to look for something that is as close to one piece as possible. You also don't want anything too fancy or delicate, because you are going to cut it out. I just printed my initial in a font I liked (Two Peas Tiger Tails) and cut it out. I then traced it onto the center of the chipboard. You could also use a letter sticker.

Bust out your X-Acto knife and start cutting!

Now take your chipboard template and center it on your card front. I used a couple of Hermafix Vario tabs to hold it in place temporarily. You can also use doubled over scotch tape if you like. It just helps if you're able to keep it from moving!

For the next step you're going to need an embossing stylus, and either a light box or a sunny window. Open up your card and lay the side with the chipboard against your light source. See how the light shines through the card stock, but not through the chipboard? This tells you where to emboss. Start by tracing your design lightly using the embossing stylus. Don't press hard on the first pass or you will crack your card stock, resulting in a cruddy looking card!

After you've gone over it once, including tracing around the edge of the card stock, go ahead and trace it again, pressing a bit harder this time.

You can see on this one where I pushed too hard on my first pass and it's a bit uneven. After you make your chipboard template, these cards take almost no time at all to make. I made a few extras to have on hand just in case I ever need one really quick. I also saved my template so I can make more if the need arises.

Don't be limited by a monogram either - if you're up to the cutting, you can do designs, greetings - it's really up to you!

Labels: , ,

Thursday, December 31, 2009

ABC - The Aftermath

As I stated way back at the beginning of the month, my motto for the month was ABC - Always Be Crafting. I may not have crafted every minute of every day, but man, it sure felt like I was coming close sometimes! I had so much to get done before family came to visit. Being on a very strict budget made it all the more necessary to stick with it as well. Here, in no particular order, are the projects that I can remember off the top of my head. I'm pretty sure this is almost all of them.

Pajama pants

I wanted us to all have matching pjs on Christmas morning, but it's really hard to find ones that come in both adult and infant sizes. I'm sure even if I were to come across them, they would not be cheap. I also have a problem buying things in holiday themes because then you can't wear them past the end of the holiday without looking like a total doofus. I ended up buying three pairs of men's pj pants on sale for $8 a piece at Target and making the third pair into baby pants using the directions in The Creative Family. I'm not so good with the pattern making though, so the baby's pants fit a little bit big and had to be pinned up in the back. That's okay, it just means he'll grow into them, right?

Knit washcloths

I made both my mother in law and my sister in law a half dozen each hand knit cotton dishcloths. I switched to these myself from cellulose sponges a few months ago, and we love them! They're textured just right to make them great for scrubbing, but they won't scratch anything. They're better for the environment because they're reusable. You just toss them in the wash at the end of the day so you don't have a sponge in your sink breeding bacteria. Some people think you can toss the sponge in the dishwasher and that sanitizes it, but oh, is that a yucky, yucky myth!

I forgot to take a photo of the finished ones. Duh.

Baby Non-Skid Socks.

Bubba was slipping and sliding all over the kitchen floor when it got cold enough so that he needed to wear socks. Someone told me that if you put puff paint on the bottom of them it would make them non skid. I also read it in Parents magazine, so I decided to try it. Not only did it not work very well, the paint peeled off after a couple of washings!

I like to call these his "Bad Word" socks.

Pinwheel Quilt

I don't even know if I should count this one. I bought the fabric, cut the squares, started sewing and pressing and sewing and piecing... and then ran out of time. I even managed to get about half of the actual pinwheels completed using the directions on V and Co's blog, but I was insane to think that I would be able to finish a full sized quilt in time for Christmas with all the other stuff I had going on. As a result, my sister in law and her fiance received a box with all the pieces and a promise it would be done in time for the wedding in May.


Felt Food

Now that Bubba as a play kitchen with pots and pans, I decided he needed some play food to go along with it. I know there are tons of play sets available out there with play food that are very reasonably priced, but the problem is that they're usually A) plastic and B) made in China. I'm not giving that to my baby who still feels the need to shove everything into his mouth! EW! There are some wooden ones that I liked (and plan to get in the future) as well as some really nice felt food on Etsy, but they're also kind of spendy. It's just not in the budget right now.

Fortunately, felt is super cheap! So is embroidery floss. I actually happen to have a ton of both in my stash of craft supplies already (I bet you're so surprised) so I decided to make up some things. I didn't have patterns, and just was winging it. I looked at photos of felt food on Flickr for inspiration. There was also a couple of orange wedges and a few slices of tomato for the sandwich that I didn't photograph because they were done after I took the photos. Oh, and the syrup on the waffle is detachable!!!

I sewed all these by hand while watching Bewitched on Hulu, starting with the first episode. That's also how I passed the time for a lot of my knitting!


Glitter Buckles for Ribbon

When I saw these on Jaimee Rose's blog a few months ago while going through her archives, I knew I had to make them. She said she paid $12.50 for eight of hers at a local shop called Melrose Vintage. Again, not only am I poor, but I am cheap as well, so I made some. I sketched out my own pattern before learning that Martha had one available on her site. Duh. I then traced it on scraps of chipboard leftover from other projects. Next, I took a Bic Mark-It marker that coordinated with the glitter I was using for that particular buckle and used it to color in the edges of the chipboard. Finally, I took Stickles and covered the fronts of the buckles. They had to dry overnight because I put a really thick layer, but they were worth the wait because the Stickles don't flake loose glitter everywhere like regular glitter and glue does.

My favorite ones were the ones made with the Platinum Stickles and gray Mark-It. The Black Diamond didn't turn out very well. I think it would have worked better if I had colored the chipboard base black before covering it in glitter. After they were dry all I had to do was thread some wide ribbon through them. These would be great for gifts that had to be shipped because they look pretty and you wouldn't have to worry about the bow getting crushed.


Cake Pops and Cake Truffles

I decided to stop calling them "Cake Balls" and start calling them "Cake Truffles." I think that sounds nicer. I had someone order some cake pops, and had a lot left over. Then I ran out of sticks so I had to switch from pops to truffles.

Pops are DEFINITELY easier.

Stockings

Since family was coming over, we were going to need more stockings! No way in hell was I going to pay $15 each for six new stockings (because you know they HAD to match) so I started to troll local thrift stores in search of fabric to make into stockings. I found this large lime green check for $5 and had enough to make them all with some leftover. I got the red burlap at Hobby Lobby for $3. Grand total - $8 for six new, MATCHING stockings. Not bad!

Tamales

I'm counting these as crafting because they are a LOT of work. I had my friend (pictured above) over to help. This was only my third time making them myself, and it was SO NICE compared to last time. I had the stand mixer to make the masa instead of having to hold a hand mixer. I had the Multi Pot which held a lot more water under the steamer basket and needed less monitoring than the smaller pot I used last time. I also had better help - he didn't whine and complain the whole time and was eager to learn. That's always nice! We made about 8 dozen, which isn't a lot compared to what some people made, but we also only ever had two people at a time working on them.

I just lack a posse of tias and cousins to help, I guess.

Peppermint Marshmallows

Another thing I got from Jaimee Rose. I tell you, that woman is a bad influence on me! The recipe is from Martha, the containers are from the Dollar Tree, and the labels I made in Photoshop and punched out using my EK Success scalloped punch. I was surprised at how easy they were and am no longer a candy-making virgin. I even have the candy thermometer to prove it!


Sugar/Gingerbread Cookies

Again, technically not a craft, but still requiring a lot of time and work and some level of craftiness, so I'm counting them! I made so many of these. Some were sold, some were given as gifts, many were eaten. I hung most of the gingerbread ones on the tree in lieu of ornaments this year as I didn't want the baby knocking any of my ornaments off and breaking them.

Ornament Wreath

Yet another thing found by Jaimee Rose, this wreath was made using the directions given by Eddie Ross on his blog. I was lazy and skipped the hot gluing part, and regretted it when I lost a couple ornaments. I used shatterproof ones I got for $10 at Target. If I put this out again I'll go back and do that step. I also ran out before I completed the loop and just filled the gap with a big-ass bow.

Christmas Cards

I went super simple this year - the boy's photo with Santa photoshopped into a simple background with a short greeting. I made them 4" x 6", sent them off to Walgreens with a coupon code, and had them printed for ten cents each. They were then mounted on a rectangle of plain white cardstock to make them feel more "finished" and mailed out in envelopes that I ran through the printer.

Play Kitchen "Art"

I made this little sign in Photoshop for the baby's play kitchen. It got printed out here on photo paper and then put into a frame that my husband found at the Walmarts for $3.

So there you have it - I spent more hours making stuff than I did sleeping. Come to think of it, I didn't sleep a whole heck of a lot this month. There were more than a couple of all-nighters pulled. It's the only way I was able to work without Bubba Grabby-Fingers distracting me. I would just take a nap with him in the afternoons to try and catch up a little. I had a few moments here and there where I worked on my own December Daily album. I do still need to wrap that up though, as having family in town puts a serious halt to projects like that.

People are always asking me how I find the time, but the truth of the matter is that you find time for what is important to you - this was important to me. If you think about it, I really don't go out much, I hardly watch television, I don't go to the gym or work out at all, and I don't have a job besides caring for my child. I decided that since I wasn't very good at anything else, I was going to rock this domesticity thing as hard as I could.

Next month though - I'm taking a break! HA!
Labels: , , , , , , , , , , , , , ,

Photobucket

©2008 Sara Madrigal Fehling. All rights reserved.

Please do not take my photos without permission.

Contact me! sara.fehling@gmail.com

Related Posts with Thumbnails