I don't know about you, but in my house there seems to always be some of those dang plastic eggs leftover from Easter underfoot. They're everywhere - in the bedroom, in the kitchen, on my scrapbook table. The only playthings that seem to be more insidious are the Hot Wheels which are all over, just waiting for you to step on them so they can send you flying. I even found one in the car today!
I decided to lessen the numbers of our wandering eggs by using three of them for a small craft project. My sister in law gave me a really nice apothecary jar for Christmas, but I haven't been able to figure out what to put in there. It held apples for a while, but they got mushy. It held lemons, but eventually I used all of those. I needed something more permanent. It was then that I remembered the eggs.
I took three of those cheap, plastic, refillable eggs:

(nice sideways pictures, Blogger.)
Open them up and lay them on some newspaper.

Give them a few light coats of spray paint in your desired base color. I used one called Almond by Krylon. They didn't have a tan that I liked in the special paint for plastics, so I just used the regular kind. It's better to give several light coats than one heavy one to avoid drips. I let them dry about 30 minutes between coats. That's about my patience level.

Next, take some plain acrylic paint and pour yourself a small puddle of it on the newspaper.

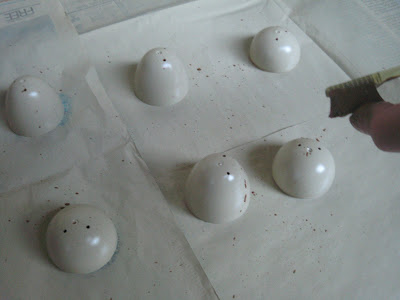
Dip an old toothbrush into the paint puddle and run your thumb along the bristles to spatter teeny droplets of paint onto your eggs. I actually did this a few times on the newspaper first to make sure I wasn't going to flick big ugly globs of paint all over.

Let them dry for a bit, then give them a few coats of a clear paint.

Let them dry several hours - if you mess them up at this point there is no salvaging them, except to paint them all over again. Be very careful putting the eggs back together so that you don't scratch the paint off of them.
I bought some green dyed moss at Michaels for a couple of bucks. About half the package fit into my jar. I shaped it so that it sort of looked like a nest - rounded with a divot in the middle. I set my eggs inside and then replaced the lid on the jar.

Voila! Easy and long lasting yet easy to change out if I get bored with it and CHEAP. That's my kind of craft project!
Labels: how-to

 Give them a few light coats of spray paint in your desired base color. I used one called Almond by Krylon. They didn't have a tan that I liked in the special paint for plastics, so I just used the regular kind. It's better to give several light coats than one heavy one to avoid drips. I let them dry about 30 minutes between coats. That's about my patience level.
 Dip an old toothbrush into the paint puddle and run your thumb along the bristles to spatter teeny droplets of paint onto your eggs. I actually did this a few times on the newspaper first to make sure I wasn't going to flick big ugly globs of paint all over.
 Let them dry several hours - if you mess them up at this point there is no salvaging them, except to paint them all over again. Be very careful putting the eggs back together so that you don't scratch the paint off of them.
 Voila! Easy and long lasting yet easy to change out if I get bored with it and CHEAP. That's my kind of craft project!


6 Comments:
so cute!
That is a really god idea...and yeah we have some of them from the Egg Hunt with the little man! Yeah and I agree with what you are saying about google reader...you have to end up going to each blog to comment...what a pain!
very Pottery Barn! Hmm, now to hunt down some eggs... :)
SUCH a good idea. I don't have any plastic eggs but now I wish I did! That's awesome. Thanks for the idea and demonstration. :) Totally cute.
These are awesome! :)
That IS awesome!
Post a Comment
Subscribe to Post Comments [Atom]
<< Home